Wednesday, May 19, 2010

Pavlova Pictures

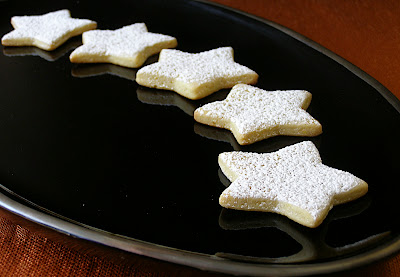
While I did make a Pavlova to both use up the egg whites from the orange cookies and to take pictures of, I did not get a chance to take pictures. This is probably for the best as my oven was being very uncooperative. These pictures are from previous Pavlovas.

Here is some raw meringue. You can see that once the sugar is incorporated into the eggs, it appears glossy and smooth.


Right out of the oven your pavlova may be cracked or collapsed. Nothing to worry about as we're topping it!

This one is topped with fresh blueberries, homemade berry coulis, and chocolate shavings. And cream of course.


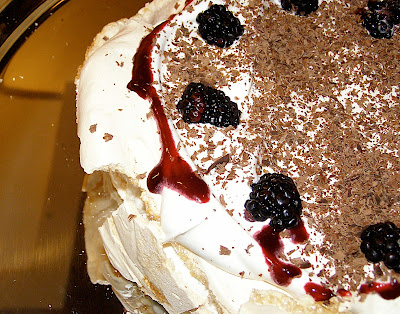
This one is just blackberries and coulis but looks like the cream might have been overwhipped. Coulis on the serving tray or plate can add a nice touch.


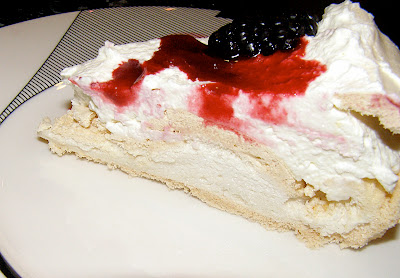
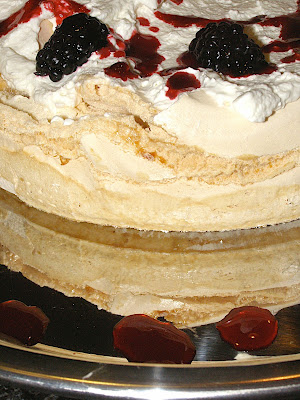
Here is a slice of Pavlova. While not the most photogenic of desserts, it is a real crowd pleaser. In this photo we can see the crunchy meringue is on the bottom, top and sides, while soft meringue makes up the center.

Pavlova with Chantilly Cream


Yield: 8-10 servings
Baking Temperature: start at 400°F
Baking Time: varies on oven
Trivia: This Australian (or New Zealander) classic was named in honor of Russian prima ballerina Anna Pavlova.

Ingredients: Pavlova


6 egg whites
pinch of salt
2 C fine white sugar
1 ½ tsp white vinegar
1 ½ tsp vanilla essence

Ingredients: Chantilly Cream

300 mL heavy whipping cream
2-4 tsp confectioner's sugar
½ tsp vanilla essence

To Top

½ to 2 C sliced fresh fruit
confectioner's sugar
or ¼ C dark chocolate shavings
or ½ C fruit coulis

Instructions
  1. Preheat oven to 200°C (400°F). Grease and and lightly flour 9" springform pan or grease silpat on cookie sheet.
  2. Beat egg whites and salt in an electric mixer at full speed until they stand in stiff peaks.
  3. Sprinkle in sugar one tablespoon at a time, beating on high until all sugar is incorporated.
  4. Fold in vinegar and vanilla.
  5. Spoon in large dollops in pan or on cookie sheet in a low dome.
  6. Reduce heat to 150°C (300°F), put pav in oven and bake for one hour.
  7. For electric ovens: Turn off heat and leave in oven until cold.
  8. For gas ovens: Turn heat down to 120°C (250°F) and bake 30 more minutes, then turn off oven and leave in until cold.
  9. Remove to or slide onto plate. Collapses and cracks are normal.
  10. To make chantilly cream: whip cream in an electric mixer, incorporating sugar and vanilla to taste. Don't overwhip.
  11. Top room temperature pavlova with chantilly cream.
  12. Prepare fruit topping. Rinse and slice fresh strawberries or blackberries; rinse raspberries; halve and scoop out passionfruit pulp; or peel and slice kiwi. Overly tangy berries can be sweetened with a dusting of confectioner's sugar then use once sugar has dissolved.
  13. Arrange fruits on top of cream-covered pavlova in pleasing pattern.
  14. Serve in slices like cake.
Notes: If fruits are out of season you can make a coulis with frozen berries and drizzle top of pavlova and plate, without dark chocolate shavings. Try chocolate flavored with mint for a sophisticated fruitless pav. Sprinkle shavings straight from a vessel as the heat of your hands will melt the chocolate. Use your egg yolks for another dessert such as custard, or make pasta.

Thursday, May 13, 2010

Polvorones de Naranja (Orange Cookies)


Polvorones de Naranja

Yield: 4 dozen cookies
Baking Temperature: 400°F
Baking Time: 10-15 min


Ingredients

4 C AP flour
½ tsp baking soda
¼ C white sugar
2 sticks butter (room remperature)
4 large egg yolks
1 can/14oz sweetened condensed milk
zest of 1 orange
¼ C orange juice

Instructions
  1. In medium bowl, sift flour, baking soda and sugar.
  2. In large bowl, cream butter and egg yolks thouroughly.
  3. Slowly add condensed milk to butter/eggs, then zest.
  4. Slowly add the drys until they are all incorporated.
  5. Finally mix in orange juice.
  6. Flour a surface and roll out small quantities dough using a rolling pin to ¼ inch thickness or less (see below).
  7. Cut 2" rounds using cookie cutter.
  8. Gently transfer to baking sheet/silpat.
  9. Bake 10-15 min at 400°F, will not brown much at all. Thin cookies take much less time to cook.
  10. Cool 2 min on sheet (if soft) before transferring to wire rack to complete cooling.

Notes: The zest and juice requirements are more or less what one orange provides. This is a big recipe and expect to do several batches. Cookies will freeze fine in an airtight container. Undecorated this cookie is sophistacated and not overly sweet but (once cooled) a dusting of confectioner's sugar or a sugar cookie frosting are fun additions. Consider having the egg whites for breakfast...


Tool notes: In addition to your usual tools you will need a fine grater, a (hand) juicer, a rolling pin, and a cookie cutter. As you can see, I used stars but a round cutter would have more evenly colored edges. See pictures of these tools here.

About Rolled Cookies

I remember the first time I rolled out sugar cookies. It was just a few years ago and I did a lot of research on how to best go about it. I have to say that this recipe, while not really a sugar cookie, is much easier for a first-time roller as the dough is a lot less sensitive to the heat of your hands.
If you've never made a rolled cookie before but you've got your rolling pin all ready to go, here are my quick hints.
  • Refrigerate dough for half an hour if it is too sticky to work with.
  • Flour your work surface and pin as necessary. Keep cup of flour nearby.
  • Find a BIG area for your work surface. I used my glass dining table. Granite, marble, or steel countertops are ideal.
  • Lay out a piece (or two) of cling film (plastic wrap) on your work surface.
  • Roll a (handful sized) ball of dough flat onto the plastic.
  • Use the cutter all over your flat dough. Flour the cutter if it sticks.
  • Peel the large pieces of scrap dough away.
  • Lift the plastic wrap and with one hand under you can peel the cookies off easily (or lift wrap right up and slap the cookie onto the silpat/cookie sheet upside-down).
  • Be careful about spilling flour on the top of your cookie because the flour will stay there despite baking.


Thursday, May 6, 2010

Chocolate Chip Cookies


Chocolate Chip Cookies

Yield: 3 dozen cookies
Baking Temperature: 375°F
Baking Time: 9-11 minutes


Ingredients

2 1/4 C AP flour
1 tsp baking soda
3/4 tsp salt
2 sticks butter (room temperature)
3/4 C white sugar
3/4 C packed soft brown sugar
1 tsp vanilla
2 eggs
12 oz semisweet chocolate chips
1 C chopped nuts (optional)

Instructions
  1. In medium bowl, sift together flour, baking soda and salt.
  2. In large bowl, cream together butter, sugars and vanilla.
  3. Add eggs one at a time, beating well.
  4. Gradually beat in dry ingredients.
  5. Stir in choc chips and nuts with a wooden spoon.
  6. Drop ping-pong size balls of dough onto ungreased baking sheet/silpat.
  7. Bake 9-11 minutes until golden brown.
  8. Cool 2 minutes on sheet before transferring to wire rack with offset spatula.
Notes: Semisweet or milk chocolate chips can be used with or without nuts; walnuts are the classic nut for this cookie. Try white chocolate chips with pecan or even macadamia for a more exotic cookie.

Tip: Chill dough overnight in the fridge or for a few hours in the freezer. Cold (defrosted) dough is easier to roll into balls plus it is claimed it ripens the flavor.

Baker's Tools

I will try to keep this as cheap and simple as possible! Here are the tools I recommend having before you begin baking from scratch.
  • electric mixer (handheld or stand)
  • set of baking tins
  • set of mixing bowls
  • set of measuring spoons
  • set of measuring cups
  • pyrex-type microwave safe measuring cup (with pour spout)
  • plastic or wooden mixing spoons
  • whisk
  • sieve/strainer
  • pinch cups
  • silpat (nonstick silicon mat for cookie sheet)
  • oven glove or pot holder
  • offset spatula
  • wire cooling rack (grid style)
I used a cheap handheld electric mixer for years before my mum treated me to a stand mixer so don't worry about spending a lot on a mixer. It's easiest to find a set of baking tins in a dark nonstick coating. These are fine but be careful to not scratch the surface with metal tools. Wooden spoons tend to take on flavors of strong foods (like garlic) so keep a separate set just for baking. Pinch cups might seem pointless but they save a lot of time being handy for keeping lots of small ingredients in order and cracking eggs. Offset spatulas look like they're just for frosting cakes but they are the best thing ever for lifting cookies from the mat because they are thin and flexible. Finally, cooling racks have to have wires pretty close together and cheap parallel bars racks just don't cut it.

So that's the list of the things I started with or wish I started with. Additional tools such as bakeware (crockery type), rolling pins, cookie cutters etc will be discussed as we come to them.


The Baker's Pantry

If you want to bake something up without a trip to the store, there are certain things you ought to keep around.
  • all purpose flour (aka AP flour or plain flour)
  • baking soda
  • baking powder
  • salt (I use iodized salt for baking)
  • white sugar (aka caster sugar)
  • soft brown sugar
  • eggs
  • unsalted butter
  • vanilla essence
  • powdered cocoa
  • powdered sugar (aka confectioners sugar or icing sugar)
  • cinnamon
I also tend to have the following handy.
  • milk
  • cupcake cups
  • chocolate chips
  • oats
  • raisins
  • food coloring
So if you want to start baking things from scratch I suggest starting here!