 |
| Sleeveless peasant blouse: I like it. |
 |
| A sketch of the design |
 |
| an embellished blouse with elastic waist and peplum, Nordstrom |
 |
| drawstring neck blouse with elastic hem, Loft |
 |
| blouse with button at back neck. Modcloth |
Drafting
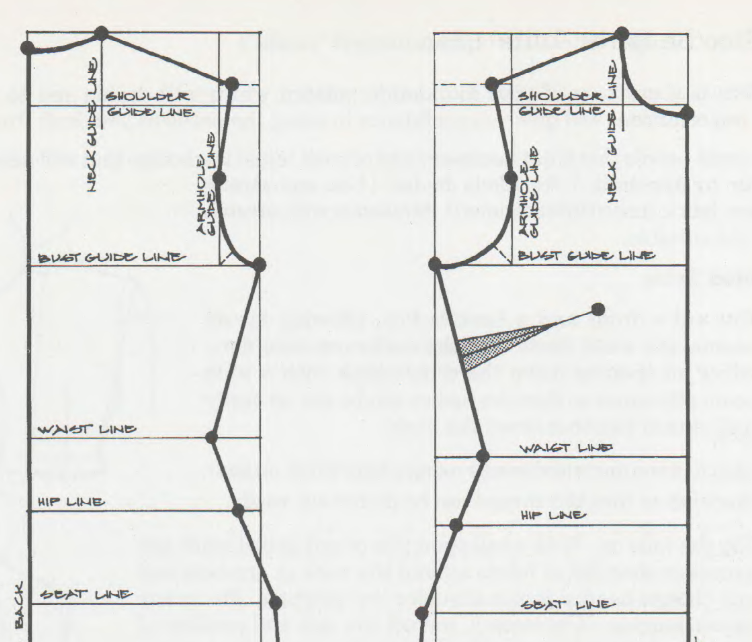 |
| A foundation block with bust dart only. |
 |
| moving darts |
I pulled out my foundation pattern (from the yellow dress), and traced it off.
Then on the bodice front I drew lines from the neckline indicating the fall of a gather. Have one these lines headed toward the bust point. Cut in your neck gather lines, fold in the dart and redraw your neckline, which has spread (on new paper). Your new neckline is wider than before. Keep the center front on the grain and finish tracing off the bodice front, taking out any waist darts.
 |
| instructions |
 |
| bodice gathered at neckline |
For this top I wanted blousing at the waist (with elastic in casing), so calculate how much blousing (I did 2 inches but perhaps 1.5" would have been better) and lower your waistline that amount. Measure down from the waist to the length you want (mine is 6.5" below the waist). I forgot to, but add extra ease at the hip, front and back, for a bit of floatiness at the lower hem. Then I redrew the side seam, bust down to hem (rather than following the instructions...). Give your back bodice the same length side seam as the front. Last of course, add all your seam allowances.
 |
| shaping the blouson |
 |
| blouson bodice diagram |
Measure the length of the front and back pattern pieces, added together this is your yardage as both will be cut on the fold.
 |
| tucked in |
Materials
1 7/8 yards (44" width) Lightweight fabric for garment and self-bias tape, 1/2"
1/8" elastic for front neckline
1/4" elastic for waistline
Thread
 |
| fabric is sheer |
Construction
Iron your fabric in half, right sides together. Lay out your pattern, and cut each piece on the fold. Don't forget to mark the waistline and any darts.With your scraps, make 2-3 yards of bias tape (I made half inch tape, cutting 1.25" rather than 1" strips due to the loose weave).
Start by staystitching your curved seams for the armhole and neckline.
Stitch shoulder darts if you have any.
Stitch together front and back at shoulders.
Stich side seams.
Finish and trim all these seams.
Finish armholes using bias tape using staystitching as guide.
Form narrow hem at bottom edge of garment.
Pin bias tape to outside of garment with the lower edge of tape even with the waist line. Stitch lower edge then upper edge, leaving a neat opening at one side seam (to insert elastic).
Baste garment label or hang tag at back neck.
To elasticize the front neckline only, apply neckline tape as follows:
Pin bias tape to neckline. Stop after first line of stitching (i.e. tape has been stitched onto inside of garment). Trim seam allowance. Having one inch of very narrow (1/8") elastic pointed to the back of the garment stitch the elastic (across) at one shoulder only. Pin bias tape over elastic all along the front bodice, tucking the elastic behind the seam allowances and being sure not to pin the elastic. Top stitch the tape along the front neckline being sure not to catch the elastic. pull up elastic to desired gather. (You can measure your neckline on your pattern and mark out that much elastic, pulling it up to where the mark shows.) stitch down the elastic at the shoulder seam. Trim both ends of the elastic to 1/2". Finish pinning and stitching your bias tape at the back neckline as usual.
Using a safety pin, insert 1/4" elastic into casing at waistline (either trying on for length of elastic or cutting it to your waist measure plus one inch). Check that is is not twisted. Overlap ends by one inch and stitch securely.
Last step is hand finishing: using a slip stitch, join all ends of bias tape (at each armhole, at neck, and at waist).
You're done! Good job :)
 |
| rear view |
Mistakes
Forgot about blousing at waist in drafting stage so garment came out shorter than expected and forgot to widen the hemline for added ease.
May have drafted the back bodice wrong as there is too much fabric at waist back.
Cut back bodice on selvedge rather than the fold (ugh). Had to put in the flat felled seam along the center back (it looks OK as a design element). Back neck and back bodice are subsequently 5/8" too narrow which is negligible.
Cut back bodice on selvedge rather than the fold (ugh). Had to put in the flat felled seam along the center back (it looks OK as a design element). Back neck and back bodice are subsequently 5/8" too narrow which is negligible.
Sewed in a little pinch at back neck and caused some kind of hole there also.
Stitched the shoulder seams forward (rather than the usual back) when applying the armhole bias tape.
Stitched some of the bias tape with straight rather than angled seams.
Stitched shoulder darts a little wonky; bias tape stitched on a little wavy in parts.
Suggestion: when working with a gauze or fabric that frays like this, I recommend all your seams be flat felled or otherwise encased. If the fabric is thin, seams are not bulky, and the encased nature of the seam prevents all fraying. Think ahead. Small garments or areas cannot be stitched this way but on such a large garment like this (also the PJs I made my dad), it's easy to stitch a flat felled for all seams. Now that I've worked with gauze I will encase all the seams next time.
 |
| gathered neckline |
What I like & Conclusions
The style: sleeveless, pull-on shape with modest neckline and long length.Fun printed gauze in summery colors and pattern I don't usually wear.
Length of fabric was $4.50 and I still have four yards of it.
Construction: Despite a long list of errors when you're looking at it none of them are visible; it looks fairly professional. Mike said "it's cute" when I showed it to him on the hanger.
This was a fun project that I could see myself making again.
 |
| P.S. Also had to make a layering camisole. |