Wednesday, January 30, 2013

Red Carpet Dress Disintegration


I love that these days I can see the latest formal styles being worn on the red carpet right away, in full color and zoomable, with commentary. Stars are much more polished these days compared to even the 1990s. Everyone looks perfect with makeup, coiffures, manicures, with perfectly coordinated shoes, bag, jewelry and most importantly a lovely designer dress. All kinds of actresses and hollywood women young and old, fat and spindly, wear lovely evening gowns to awards shows. I love it.What I don't love, what I am confused about, is why three times now I've noticed stars having major dress malfunctions. What's going on?

Sofia Vergara : Separated Zipper
Sofia Vergara: before

Sofia Vergara: Busted Zipper
Sofia Vergara's dress's zipper has failed. This dress is very fitted, and the seat is a stress point. Usually ease is added to the seat but this dress has been tailored perhaps too tightly, removing ease. (This fabric obviously has no stretch either.) If you must have a closure at a stress point, consider a more robust one, such as hooks and eyes or a metal zipper.


Julianne Hough : Ripped at Seams
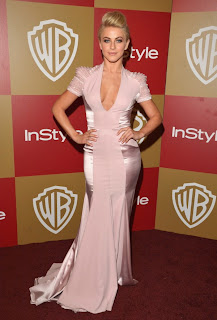
Julianne Hough: Before
Julianne Hough: Ripped at Seams
This dress has ripped at the seams between the flat textured fabric and the charmeuse. Ostensibly the dress ripped due to vigorous dancing. The only way to avoid such a failure is to add design ease (or stretch), for movement. This dress appears to have been tailored too tightly, removing ease. When having a garment fitted, be sure to sit down, climb stairs, and if you're a vigorous dancer give that a try, too. Looking good standing still isn't worth it if you look like a goof when your seams fail.
This is an interesting example of the importance of stitch length. When choosing a stitch length, choose one long enough so when you stress the fabric, the stitches break rather than the fabric ripping. This is what happened to this dress, so it is repairable.

Jennifer Lawrence : Ripped or Weird Design?
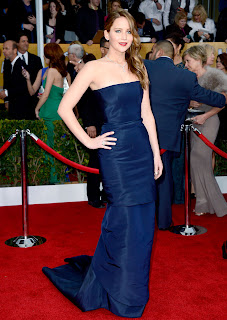
Jennifer Lawrence: Before
Jennifer Lawrence: Exposed Thighs
I don't know who to believe on this dress. In the case that a seam has ripped, it is due to the same problem as Ms. Hough. The tailoring has been too tight, and the threads have ripped out due to lack of ease.
According to Dior the design is layered and the sheer panel is supposed to appear at the thigh. Apparently the actress was holding her dress up during her speech to cover her thighs. I guess designers and personal stylists having no clue what actual women do when they wear a dress. No one predicted this Ms. Lawrence would sit down, stand up, and climb stairs (an everyday activity done often at awards shows!) and expose her thighs to her own surprise. Prevent this by testing your dress during fittings to see if there are any design surprises.

I hope this series of "wardrobe malfunctions" playing out on Twitter, Instagram, and live on TV convinces stylists and designers to consider the importance of ease and of testing movements in a design. For people who sew or wear fancy dresses, consider carefully your stitch length, choice of closure, and amount of ease.

Thursday, January 3, 2013

How to take a nice self-portrait

nice portrait, no photoshop
I don't have a glamorous lifestyle with lots of opportunity for candid portraits, so when I get bored with my profile picture, I shoot a new one. [I am not here to talk about how amazing I look in my new picture but I'm a good enough photographer and self-critic to know what looks good. I would have uploaded a no-makeup picture but they've all been deleted. Au naturale, I have uneven skin tone, acne, and unruly hair.]
Here is a quick tutorial on taking a quick seated self portrait.

Preproduction

Before we get started with the photography, take a minute to consider your grooming. Don't imagine you can photoshop flaws out later - it's easier and more honest to deal with your appearance before you shoot a frame.
  • Attend to facial hair and blemishes, moisturize skin.
  • Style hair (For me: wash, blow dry, flat iron, using setting cream and hair spray)
  • Touch up the face: For most women, at a minimum use eyeliner, powder in the center of the face, and lipcolor to offset the effect of the powder. Men should apply clear balm to the lips and use blotting papers on shine. (For me: full makeup including foundation, blush, brozer, powder, eyeshadow, eyeliner, mascara, brow fill, and lip color.)
  • Choose the right garment: a solid color is the safest bet. Don't clash with your background.
  • Accessorize: the right earrings or coat will make you feel nice without being overdressed.
Setup: You will need

  1. Digital camera with timer, flash, and tripod mount.
  2. Tripod.
  3. Plain background such as a curtain or unadorned wall.

Here is a diagram of how I set up my portraits. Men and people with thin faces may be satisfied with the camera at eye level rather than higher. Do not have the camera below your face.
Women look cuter when the camera is higher because it makes the male viewer think he's tall and masculine in comparison. Don't question the logic if you have any kind of double chin.
I shot these pictures inside on a rainy day; the only light source in these photos is on-camera flash. If you have found a nice wall outdoors you can certainly use the same setup but consider external light sources. The sun should be low or the sky overcast. All shadows on the subject and the wall must be considered.


Shooting

On most digital camera you are going to want to use two or three different setting tweaks to make this good. Take your time and shoot a lot of frames, stopping to check your framing, exposure, and expression. If your room is large you can move the camera back and zoom in. Take care to have excellent posture and experiment with different shoulder positions. Avoid the "mug shot" angle of facing the camera directly with face and shoulders.
The photo we're aiming for is a vertical or square portrait. The human face is generally a long oval so shoot with the camera positioned vertically.

Shoulders too square; Hunching
  • Use an appropriately high quality picture setting
  • Set the flash to "on," and decrease the intensity if necessary
  • Use the timer (or a remote)
  • Use the multiple-frame option, for more shots per pose
  • Consider setting the manual focus to an appropriate distance.
flash too bright


Finishing

Crop the photos of extraneous background and torso. Crop before uploading or utilize the tools of your photo service: facebook, flickr, and many other websites allow you to rotate and crop.

arm's length portraits rarely have a clear background

If you have long hair it doesn't have to all be in the frame. If you background is long, include more torso if you'd like, but full length glamour shots are a different story altogether :)

I ran across this article on babble.com: 15 Women Photographers Share Their Self-Portraits and Photo Tips. Lots of examples of different poses and types of portraits.

Love-heart Rolled Chocolate Cookies


chocolate cookies with raspberry icing

Chocolate Rolled Cookies

Ingredients

1 cup butter
2/3 cup granulated sugar
1/2 cup brown sugar
1 egg
2 Tablespoons chocolate or coffee liqueur or strong brewed coffee
1 teaspoon vanilla extract
1/2 cup cocoa powder plus extra for rolling
3 cups all purpose flour
1/2 teaspoons baking soda
1/4 teaspoon salt

Instructions
  1. Whisk together the flour, cocoa powder, baking soda and salt.  Set aside.
  2. With an electric mixer cream together the butter and sugars until fully incorporated and fluffy.
  3. Beat in egg, coffee or liqueur, and vanilla.
  4. Add in drys mixture about 1 cup at a time.  Blend until fully incorporated.  (If you are using a hand mixer you may need to add the last cup of flour by hand).
  5. Divide dough into two or three large balls, place in a plastic bag and chill in the refrigerator 1-2 hours (if you’re in a hurry, you can chill the dough for about 20 minutes in the freezer).
  6. Once chilled, work with one ball of dough at a time, and roll onto a surface lightly dusted with cocoa.
  7. Cut out desired shapes with cookie cutters and place on a baking sheet.
  8. Place the baking sheet (with cookies on it) in the freezer about 5 minutes (this helps the dough keep it’s shape when baked).
  9. Bake cookies for 7-10 minutes (depending on size) in a 350°F oven.
  10. Allow cookies to cool on baking sheet a few minutes and then transfer to a wire cooling rack.
  11. Ice with sugar cookie icing and decorate as desired.
Source: Glorious Treats
Yield: 2 dozen+
Baking Temp: 350°F

Tip: Roll out thicker than you normally would roll cookie dough, such as to 3/8".

Sugar Cookie Icing

Ingredients

2 tsp milk
2 tsp light corn syrup
1/4 tsp raspberry (or other) extract
a few drops of food dye
1 C confectioner's sugar, sifted

Instructions

  1. In a small bowl, stir sugar and milk until smooth.
  2. Stir in corn syrup, extract, and dye if doing one color. Gently stir until icing is smooth, glossy, and thick.
  3. If doing two colors, divide out into separate bowls, add dye, and stir.
  4. For method pictured, using thick icing, pipe a closed shape as an outline.
  5. Thin icing with milk until just thin enough to flood within your border. Pipe or spoon within borders, smoothing with small tool until it meets edge.
  6. Let harden at room temperature.

Tips
  • Use a coupler with a ziploc baggie. Use 2mm decorating tip.
  • Use your non-dominant hand to squeeze the bag and your dominant hand to direct the tip.
  • I have more rolled cookie tips with Polvorones de Naranja.


Aussie Meat Pie

Meat Pie with ketchup

I have been craving an Australian Meat Pie every cold winter since I've been in the U.S. Now that I have confidence in making pie I thought it was high time to find a recipe. This is an easy recipe because it is a skillet meal placed in premade dough crusts (shortcrust and phyllo). You could also do what I did and use your usual flaky pie crust for the base and top of the pie.
This is a departure from my usual post as it is a savory recipe, but that's how much I wanted to share it.

Aussie Meat Pie

Ingredients

1 tablespoon olive oil
1 large brown onion, finely chopped
1lb (500g) lean ground beef
1 tablespoon corn starch
3/4 cup beef stock
3/4 cup ketchup
2 tablespoons Worcestershire sauce
1 tablespoon barbecue sauce
1 teaspoon Vegemite
2 sheets frozen, ready-rolled shortcrust pastry, thawed
2 sheets frozen puff pastry, thawed
1 egg, beaten
Pinch pepper

Instructions
  1. Heat oil in a saucepan over medium-high heat. Add onion. Cook for 3 minutes or until soft. Add beef. Cook for 4 minutes, stirring with a wooden spoon, or until browned.
  2. Mix corn starch and 1 tablespoon of stock to form a paste. Add remaining stock. Add stock, sauces and Vegemite to mince. Bring to the boil. Reduce heat to medium-low. Simmer for 8 minutes or until thick. Cool.
  3. Preheat oven to 425°F (220°C). Place a baking tray into oven. Grease four 3" (8cm) base measurement pie pans or eight for jumbo muffins.
  4. Cut 4 x 15cm circles from shortcrust pastry. Use to line bases and sides of pans. Spoon in beef filling. Brush rims with water. Cut appropriately sized circles from puff pastry using a cup as a guide. Place over meat. Press to seal. Trim. Brush with egg. Season with pepper.
  5. Place pies onto hot tray. Bake for 20 to 25 minutes or until golden. Serve.
Tips
  • I halved this recipe and it yielded four pies made in a jumbo muffin pan.
  • Dark nonstick pans needn't be greased in this case.
  • If some of the cups of a muffin pan are empty, fill with water for even heat distribution to the food.
  • Serve with ketchup.

Original Source: Taste.com.au