Thursday, August 25, 2016

Quick hit: Remove Annoying Garment Tags and Tacks!

 How to Remove Annoying Tags on Clothes

YOU CAN remove the single straight line of stitching to get this tag off!
We've all experienced giant, flappy, or worse, itchy garment tags. Good news, everybody! Many tags can be removed without damaging the garment and with hardly any effort.
  1. Determine how the label is attached.
  2. If attached with a single, independent line of stitches, rip out with seam ripper, razor blade, manicure scissors/clippers, etc.
  3. There are only two steps!
YOU CAN remove the single straight line of stitching to get this tag out!
I like to use a seam ripper
Ta Da!
 Ivory garment and multicolored garment with black stitching: Examples of one independent line of stitching for just the tag; these tags are suitable for being removed.

DO NOT try to remove stitching to get this tag out!
Orange/white garment with orange stitching: Example of tag sewn on with a construction seam and NOT suitable for removal. This tag is installed in a serged seam (very common).

DO NOT try to remove stitching to get this tag out!
Purple garment: Example of tag sewn on with a construction seam and NOT suitable for removal. This tag is installed in a flat felled seam.
If you are very compelled to remove all tags because of special needs or extra sensitive skin, it is possible to rip apart a construction seam to get the tag out and restitch the seam with matching thread. This is more advanced but any person who sews or tailor/dry cleaner can easily do it. Obviously you can also just trim the tag down with scissors but I find this to be still itchy.

While we're at it...

Remove Ugly Thread Tacks!

Do you see the ugly thread tack? It's black and right in the middle.
I like to use a seam ripper.
Looks Great! A quick press will get those tiny holes to disappear.
Bonus content today is an example of a thread tack - the type used often in pants to hold on paper/cardboard size & brand labels for easy identification in store. These tacks are MEANT TO BE REMOVED. Use that trusty blade (seam ripper, razor blade, manicure scissors/clippers, etc.) to remove these little buggers and leave the house in style.
Image from RealMenRealStyle who are just as annoyed by this as I am
Dude, I recently watched a whole play where freaking Benedic (the lead in Much Ado About Nothing) had not removed the cross stitch from his obviously-new suit jacket. Child, you look silly. Remove this tack and you will look fly. If you're wondering why it's even there, it's so the garment hangs nicely on the rack and for ease of transport. BTW, temporary stitching is also used for pockets and lapels on jackets, pockets on pants, pleats in things like skirts, and holding the brand name label to the cuff of jackets and coats.
I will say my mum does not remove basting stitches on pants pockets because she prefers the smooth line of a no-pocket pant. Personally I use pockets all the time, whether for hands, or objects, and therefore automatically remove all basting stitches. Team pockets.

Wednesday, August 24, 2016

Mending: The Catch-Stitch Patch

Introduction

For this series I am going through an old sewing book and experimenting with the projects within it. The book is called "The Sewing Book,  Containing Complete Instructions in Sewing and Simple Garment-making for Children in Primary and Grammar Grades," Edited by Anne L. Jessup, Published by the Butterick Publishing Company, New York NY, 1913. The book is out of copyright (and free to all). It has been scanned as part of the Google Books effort and is available in various formats, visit https://books.google.com/books/about/The_Sewing_Book.html?id=b7wwAQAAMAAJ

Catch-stitched Patch

[Practice] Supplies

Flannel, either striped or plain, 5 by 5 inches, and 3 by 3 inches; Cotton, no. 60 or sewing silk the color of the flannel; Needle, No. 8, etc.

[Instructions]

This patch is suitable for underwear. Cut away the torn part, forming a square hole. Baste the patch under the hole, matching the warp and woof lines. Catch-stitch on the right side, taking the lower stitches just below the edge, the upper ones about a quarter of an inch above the edge. Turn to the wrong side and catch-stitch the patch to the garment. The edge of the patch should not extend more than three-quarters of an inch on the wrong side around the square.

Note

The single edges are used in this patch to avoid the thickness of folded edges of material of this kind. The stitches should be small and very even, one being taken diagonally in each corner.
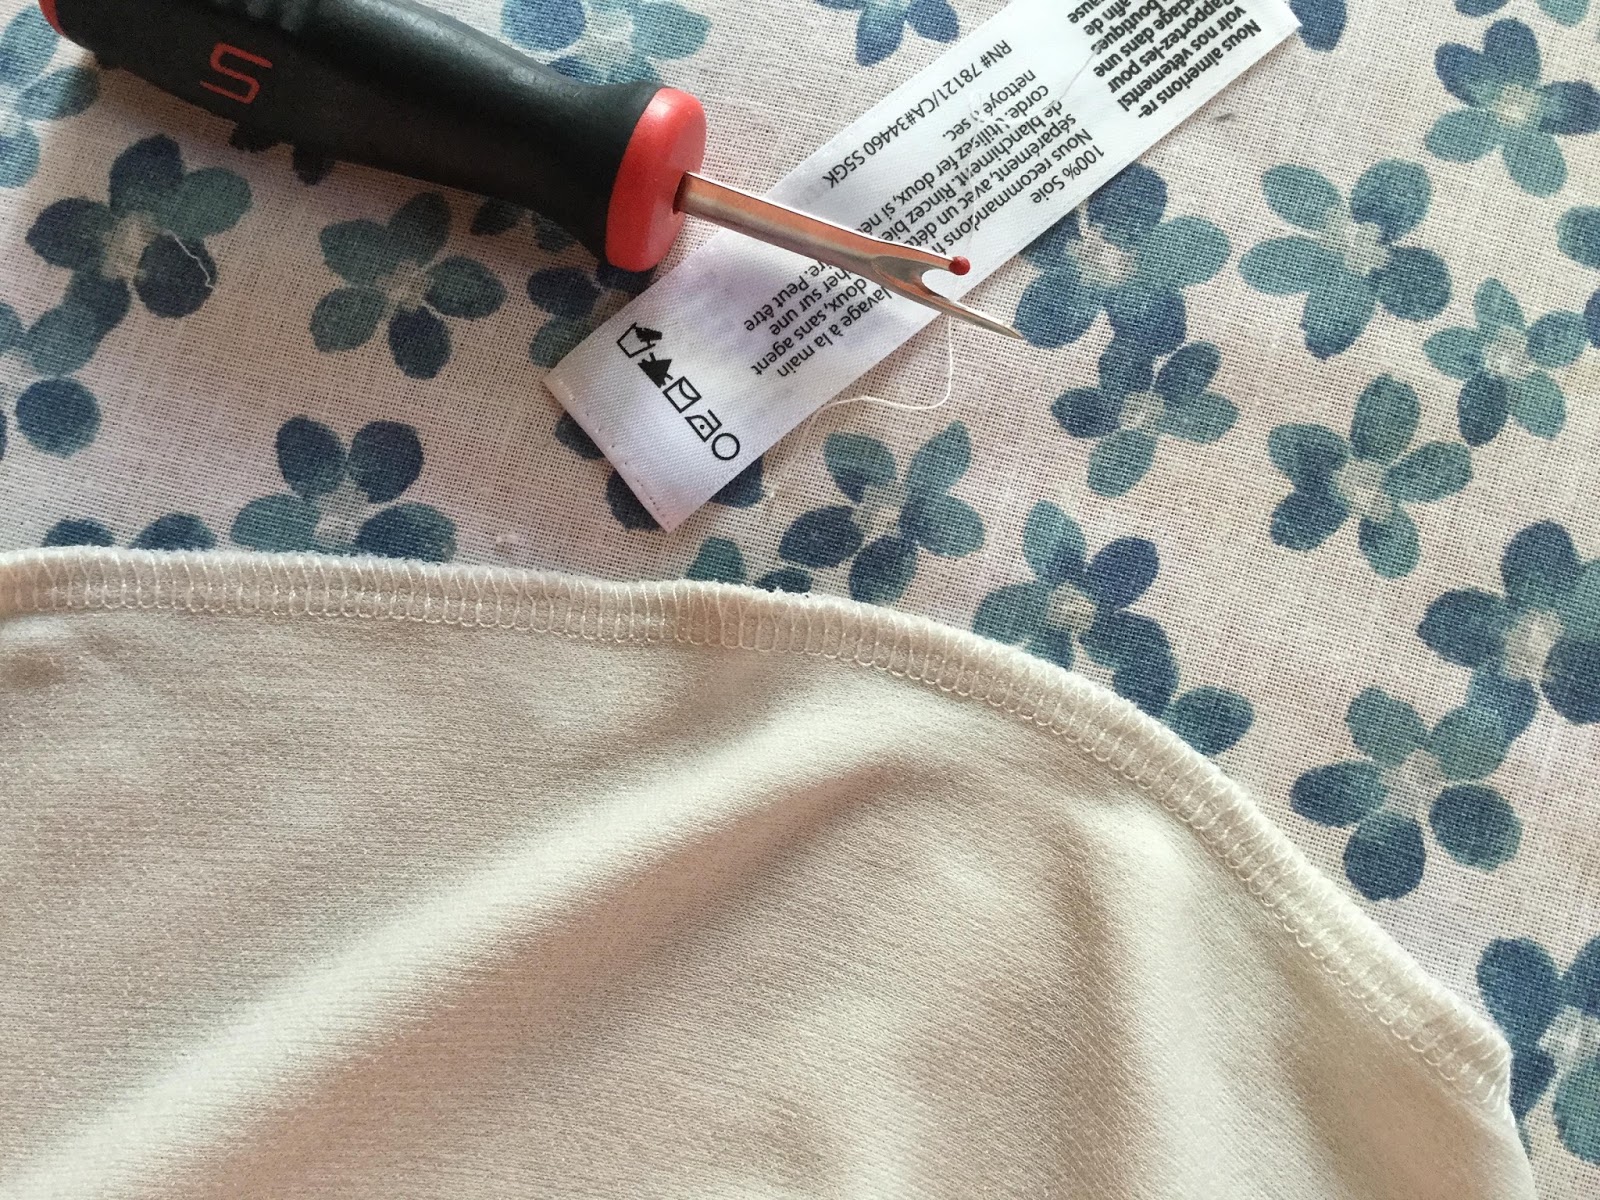
My Practice Patch


My Comments

We may be most familiar with flannel as cotton "flannelette," in things like winter pajamas and plaid shirts. Wool flannel is still available today.  See some flannel underwear here.
When I made this sample patch, I had no wool flannel scraps. I used some cotton flannelette. Obviously the black/blue side is the right side and the white side is the wrong side. As you can see my hand stitches are uneven. For that reason I would only do this kind of patch on a solid fabric where the stitching would be less visible on the front. If your stitches are even, then that wouldn't be a problem. The front stitching (first in instructions) was easy to execute. The stitching on the back seemed just as easy but after refreshing my memory on the catch-stitch, it turns out I should have taken the lower part of the stitch through both layers of fabric. That would add some more stability. These stitches are barely visible on the front, which is nice.
I would recommend this type of patch if you know the fabric won't show (e.g. underwear is covered up), won't fray (or won't be washed or hard-worn), if it is dyed through (not a print like the flannelette I used as the white shows in little bits on the front), and if the fabric is too thick or uncooperative for other types of patches.
This patch is designed for be made with hand stitching (but it's only one kind of stitch, which is nice and easy). To machine stitch this patch perhaps a zig-zag or better yet three-step zig-zag would work. However these stitches will show more, by which I mean the second line of stitching that is worked from the wrong side will be just as visible on the front as the first right-side stitches. Other patches are better suited to machine stitching.
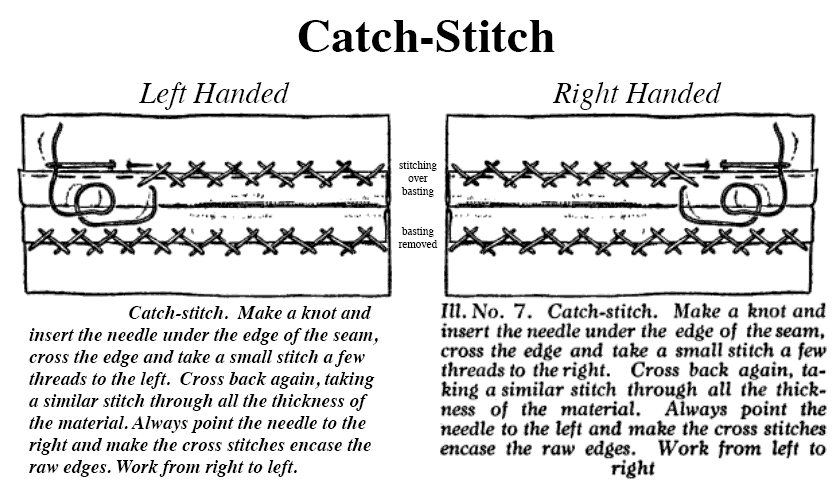
The Catch-Stitch

Because I'm so nice, I'm also providing the catch-stitch instructions from the book with added left handed instructions because duh.

Tuesday, August 23, 2016

Clothing Repair, Economy, and Restyling Downloadable PDFs

Repair of Clothing and Household Linens


It was years ago (the 70s?) that environmental interests came up with the slogan "recycle, reduce, reuse." Decades before that, in the midst of WWII, came "make do and mend." In the spirit of both, I have been looking for ways to make the most of the clothing I already own.

Here is a list of DOWNLOADABLE PDF pamphlets I have gathered from around the web - almost entirely from various American university cooperative extension programs or university archives of such. (If you are not familiar with extension programs, they are pretty cool. They date back to 1914 and are the precursor to community colleges.) I do have a large collection of these PDFs and hopefully this list will be followed by others.

 Please note that these are historic resources. They may refer to methods and items that are no longer sold or considered safe (home dry cleaning with gasoline, I'm looking at you). Do not follow such advice without exploring modern resources and using your best judgement. This first batch I have categorized as Clothing Repair, Economy, and Restyling.

Clothing Repair, Economy, and Restyling

YearTitleAuthorPublisher
1938Repair of Clothing and Household LinensHelen RockeUniv. Nebraska, Lincoln
1942Make Do and Mend for Victory--The Spool Cotton Co.
1943Clothing the Family in WartimeHelen RockeUniv. Nebraska, Lincoln and USDA
1943Fall and Winter ClothesHelen RockeUniv. Nebraska, Lincoln
1943Make Do and MendBoard of TradeMinistry of Information, United Kingdom
1946Clothing Pointers for '46Helen RockeUniv. Nebraska, Lincoln and USDA
1951New Clothes From OldAllegra WilkinsUniv. Nebraska, Lincoln and USDA
1962Repairing GarmentsAnna Marie KriefelsUniv. Nebraska, Lincoln
1962Reinforcing ReadymadesAnna Marie KriefelsUniv. Nebraska, Lincoln and USDA
1971Restyling or Remodeling a GarmentJane Speece, Gerda PetersenUniv. Nebraska, Lincoln and USDA
1971Restyling Sweater KnitsJane SpeeceUniv. Nebraska, Lincoln and USDA
1971Relining Coats and JacketsJane SpeeceUniv. Nebraska, Lincoln and USDA
1971Inset (Overall) PatchJane SpeeceUniv. of Nebraska, Lincoln
1972Altering Ready-Made DressesAnna Marie Kriefels, Jane SpeeceUniv. Nebraska, Lincoln