Wednesday, October 10, 2012

Awesome Easy Throw Pillows

Here are some throw pillows I made for my brother, who calls them "awesome." The couch pillow inserts are feather-down and the zip-off, washable covers are a red satin brocade with gold/multi dragon/medallion design, with black satin quilt-type flange.
These were very easy to make.


Materials and Costs for Two Pillows

  • Pillow Insert from Crate & Barrel, 18x12 is $8@ +$5 shipping = $22
  • Fabric $10/yd = $10
  • Zipper $2@ = $4
  • Satin Single-Fold Blanket Binding, 4.75 yd per package = $7
  • Thread = $1

The total of these prices is $44. I do believe I got everything on sale so the costs can easily be lower.

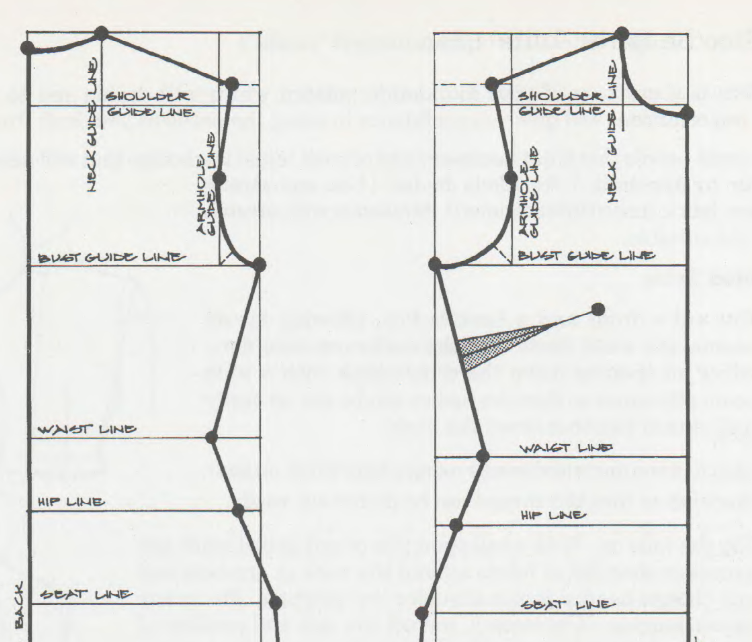
Drafting Instructions

Using regular small paper we will draw schematics.
The pillow is Width by Height measured across the fullness. If you want ease, add it now. Sketch a rectangle labelled with the width and the height plus ease, this is your pillow front. My measurements have no ease for a crisper looking finished pillow.
Divide the width by 3, as i want the zipper one third across. We have an 18" wide pillow with no ease. 18/3=6. Our short side will be 6" wide, by the same 12" tall, this 6x12 is left back of the pillow. For right back, we subtract that 6 from the original 18, which is 12. The right back will be 12x12.
We want a zipper to connect the left back and the right back. Add 1" (or more) to the width each back piece for the zipper allowance. Our left back is now 7x12, and right back is 13x12.
Last step is adding the seam allowances. Let's make them 1/2".
That makes our Pillow Front 19x13. Our Left Back is 7.5x13. Our Right Back is 13.5x13.
Now that we have our pattern pieces, we have to decide on the pattern layout. Our fabric has a one-way design so we can't flip any rectangles to the side. What if we put all three pieces right next to each other? Yes, the widths of 19, 7.5 and 13.5 equal 40. 40 < the 44" width of fabric so there is room for that layout.
What if we make use of the selvedges? The pattern peice right back has a zipper edge on the left hand side, lets put that on the left side of fabric and the selvedge edge can be used as a finish edge, rather than finishing it some other way such as with zigzag stitching. We can put our front pattern piece next to it, and our left-hand pattern piece on the right side of the fabric again using the selvedge on the zipper seam.
Duplicate the underneath for your second pillow. The lengths of 13 for two pillows is 26. We need a piece of fabric at least 26" long if all our cuts are perfect. Rounding up for cutting errors we can get 7/8 yd (31.5") or 1 yard (36").

Cutting & Sewing Instructions

The dragon fabric is very geometric. If you trust we have a good, on-grain design to work with, I recommend you learn from my mistakes and use the design as a guide. Do not fold the fabric, cut in a single layer, right side up.
For each pillow cut one of each piece, starting with cutting a length of fabric from selvedge to selvedge that is 13" long. Then divide with vertical cuts on the left hand side our 13.5x13, 19x13 in the center, and 7.5x13 resting on the right selvedge.
Repeat for the second pillow.
Start by marking in the zipper one inch from the width on the two adjacent back pieces. Place left back and right back, right sides together, along this edge. Pin. Center the zipper vertically and mark it's length. If it's a 10" zipper then there's a 1.5" distance at top and bottom. Stitching one inch from selvedge, we want a regular stitch for 1.5" above and below the zipper with backstitching, and a basting stitch in the middle. Press open. Install zipper along this seam now, centered if you like. Finish zipper with prick stitching now, then remove basting stitches.
Our zippered back should now match up perfectly with our front piece.
As our pillows will have a flange, our seam allowances will be on the outside of the pillow, to be covered later by the satin binding.
Place the zippered back WRONG sides together with the front piece. Pin all the way around. Machine baste.
Take your satin binding, iron the package wrinkles out but leave the center fold in. We are going to make a sandwich. The binding is folded off center. Starting at one edge, laving the longer side at the back, pin the binding around the seam allowances, hiding the basting stiches. Miter the corners your preferred way; I mitered as I went. When you reach a corner, fold the binding back along itself to make the turn. Iron and pin. Make sure the raw edges at the beginning and ends are concealed by hiding within the folds of the miter.
Hand-baste or pin the mitering in place.
Working with the longer side of the binding down, stitch the binding onto the pillow with a plain stitch. Make sure to catch all of the seam allowances, the long side and the short side all. Pivot as the corners as normally.
Hand finish the mitered corners with a catch stitch.
Insert the pillows into the covers.
That's it! Good job.

Friday, September 14, 2012

Black Linen Trousers S3688


I was looking at my JoAnn app the other day and saw I had a 60% off coupon. That is the best coupon I've seen since black friday last year (when I got all my holiday gift fabric) so I hastily went shopping. I got some black swimwear fabric, because it's been impossible to find a bikini top that's remotely supportive, and I got three yards of 100% linen in black.
I'm a big believer in linen for the summer months. I'm generally a fan of natural fibers; synthetics have their place, but summer clothing is not it. I have two pairs of elastic-waist linen trousers from Target - the older pair is patched and the newer pair is headed in the same direction - overworn! I don't think elastic waist is the best choice for summer either, it bunches the fabric in a place you're bound to get sweaty. By summer I mean temperatures that are not a surprise when they are 100°F for a week straight. I sweat A LOT in summer, from all over my body. My face, my scalp, any creases like behind the knees, even my upper chest and lower back will sweat when I'm not even doing anything. It's awful (and gross, sorry).
So linen pants are the bomb, elastic waists are the devil, and three yards of linen for $20 is rock and roll. I already had trouser patterns I wanted to try - Simplicity 3688 and 4044. Both are from the 1940s vintage reprint line, but 4044 had a faced waistline and 3688 had a regular waistband (like the one I put on my black and white skirt).  One's waist is located at the lower edge of the 1.5" waistband in these S3688 trousers, so they're not truly high waisted.
Before cutting, I traced out the upper curves of the front piece and drafted a pocket. This took a couple of hours as I had to think out every step - like the pattern has seam allowances but if you draw any new edges you need to add them. I roughly measured the pocket dimensions on other trousers. What I did NOT do, is consider the side zipper, and paid for it later.
Do yourself a favor and ADD EXTRA SEAM ALLOWANCE for the zipper area, it makes it a lot easier to work with. you can add it all the way down the pattern piece or just for the area the zipper will sit. Either way it makes setting in a zip much easier to physically install in the seam allowance. And if you hate zippers (or... want to be more historically accurate... I thought this was a 40s pattern) you can add a button allowance instead. This is covered in the Reader's Digest sewing book. I may do this when I remake these trousers.
Construction went uneventfully until I got to the waistband. At first it looked like the waistband I cut would in no way fit around my waist, especially with a button lap. So I recut it in a better size and it turns out it's a little too big (like my black and white skirt!). Ugh. Then I notice I put the zipper lap on the wrong side (which would explain why the diagrams looked wrong). The lap part goes over, so it needs to be on the buttonhole side, which also goes over. So I reinstalled the zipper.
My final result is curved front pockets with a plain finish, with bar tacks. A centered zipper, pickstiched. I find the darts on these trousers completely adequate. I believe they flatter my rear and when I mentioned it, my husband emphatically agreed.
These trousers are 40s in the regard they have a deep crotch. Or maybe it's just me. If I were to redo this pattern in a more modern silhouette or a heavier fabric, I will remove one inch from the crotch depth (front and back). These are summer trousers and I want them as loose as possible, so I'm OK with the roomy fit.
I think the Chinese linen fabric from JoAnns is adequate, for the sale price anyway, and I look forward to making more things with linen. It takes a very high iron temperature, you can starch it to death if you have a complicated bit of stitching, and it also happily bunches up and crushes if that's what you want too. This particular linen is quite heavy, certainly a bottomweight, but I imagine it is a pleasure to work with in any weight.
I do want to make up a pair of tap pants (loose underwear shorts, or "divided slip") as it would be quite comfortable with a 40s trouser, not to mention historically accurate. Furthermore I find woven fabrics are superior in summer as they breathe much more readly than a clingy knit. Every pair of underwear I have is a stretchy knit, so I'd like to see if some silk drawers improve ventilation. I may use this pattern as a jumping off point for drawers.
Overall I think these trousers came out well. I want to remake them in a different fabric with some minor adjustments, and I think I learned some things while making them. I want to wear them which means they are a rousing success!

Thursday, July 5, 2012

That looks comfy: Simplicity 2409 Jersey Top

I'm happy with how this top, Simplicity 2409 view F by Khalia Ali, came out.
Having had success with other of Khalia Ali's styles, I decided to try a short sleeved top, for summer. This view F has flutter type sleeves that are laid over a tank style bodice. Attaching the sleeves was the only difficult part of this pattern. It is an overlay so you just have to think it through carefully. The center of the bodice is separated from the sides on a long seam located close to the bust point; it is on that seam that the flutter piece is added like cheese in a sandwich. Once I figured all that out, the rest went pretty smoothly.
I do recommend you get a ball point needle if you do this project in a knit. After I did this garment I did one more thing in a knit, but with a ball point needle in the machine, and it went much more smoothly. The only seam that I had trouble with on this top was the long lower hem. Could have a better finish.
Also don't forget for this view there is a bias binding neckline. I made my own bias strips from a nice coral colored linen scrap I had lying about. If you use a solid colored fabric for the garment you could really bring in something interesting to your neckline if you wanted, such as a contrast solid or a print.
In the future I will remake this top, as jersey fabric comes to me. I also would remake this but add a lower panel, to make a "maxi" (long) dress.
I don't wish to dwell on how my figure illustrates this, but this pattern is a "suitable for maternity" (i.e., pregnant women). There's a few versions of the tops, they all have an empire line, and you could modify it to a dress. For the spring/summer pregnancy, this would be a real favorite for casual wear. You could also make this up and not have to worry about how much bigger your bump gets, because any size is accommodated, and wear it after the pregnancy as the bump fades away. This pattern is available in regular women's sizes as well as plus.
What I did with this top is not fully enclose my elastic (at the underbust). The casing is completed most of the way around, but instead of stitching together my elastic ends, I tied them, and left the whole knot out of the stitching. That way I can replace the elastic if it gets ruined in the wash, or retie it shorter if the top becomes too big. This is an idea for you pregnant ladies! The only concern you'd have as your pregnancy develops is keeping an eye on your lower hem. You could start with an unfinished, even hem that is a little long, and modify it later with a hand stitched hem so the front doesn't look like it is too high in the front, and finally let it back out after the pregnancy. Just an idea.
Whatever the status of your uterus, bear in mind that if you are short (and/or your fabric is quite drapey), you will need to take some length off the hem. Obviously this top came out quite long on me, which I'm OK with. Another four inches and it's a dress, though, so if you're 5'2" just go ahead and modify the pattern before you cut. Unless you do want a dress in which case lucky you.
I have worn this top several times now and I always feel pretty in it. At one point I got a compliment, so that was nice. I think there are a few reasons why I like to wear it.
1. It is loose and long and drapey, and downplays any figure flaws
2. The color is very flattering to me
3. I made it, lol.
I was quite happy working with the April Johnson for Project Runway jersey fabric. There's a noticeable right and wrong side with the slub finish, but don't let that deter you. I easily found matching thread. I look forward to new fabric collections from Project Runway participants, especially ones in natural fibers.
(Fun fact: rayon is a "semi synthetic." It's made from wood, but the cellulose is obtained in a lengthy chemical process, leaving it in a grey area of not a natural fiber, and not a man-made fiber either. Rayon has quite a following, however, for it's silky hand and lovely drape in all kinds of wovens, jerseys, and blends.)

Front view

Top has bias binding at neck.

Rear view.

Monday, June 4, 2012

Draft and Sew a Sleeveless Peasant Blouse

Sleeveless peasant blouse: I like it.

A sketch of the design
I found a length of gauze (or voile?) in citrus with pastel flowers at the thrift store. It's such a light, airy weave that I decided it had to be a summer top, even if it was poly-cotton. I decided on a peasant shape as it seemed easy to execute.

an embellished blouse with elastic waist and peplum, Nordstrom
drawstring neck blouse with elastic hem, Loft

blouse with  button at back neck. Modcloth

Drafting

A foundation block with bust dart only.

moving darts

I pulled out my foundation pattern (from the yellow dress), and traced it off.

First I lowered the neckline front and back.
Then on the bodice front I drew lines from the neckline indicating the fall of a gather. Have one these lines headed toward the bust point. Cut in your neck gather lines, fold in the dart and redraw your neckline, which has spread (on new paper). Your new neckline is wider than before. Keep the center front on the grain and finish tracing off the bodice front, taking out any waist darts.

instructions
bodice gathered at neckline

For this top I wanted blousing at the waist (with elastic in casing), so calculate how much blousing (I did 2 inches but perhaps 1.5" would have been better) and lower your waistline that amount. Measure down from the waist to the length you want (mine is 6.5" below the waist). I forgot to, but add extra ease at the hip, front and back, for a bit of floatiness at the lower hem. Then I redrew the side seam, bust down to hem (rather than following the instructions...). Give your back bodice the same length side seam as the front. Last of course, add all your seam allowances.

shaping the blouson
blouson bodice diagram

Measure the length of the front and back pattern pieces, added together this is your yardage as both will be cut on the fold.
tucked in

Materials

1 7/8 yards (44" width) Lightweight fabric for garment and self-bias tape, 1/2"
1/8" elastic for front neckline
1/4" elastic for waistline
Thread

fabric is sheer

Construction

Iron your fabric in half, right sides together. Lay out your pattern, and cut each piece on the fold. Don't forget to mark the waistline and any darts.
With your scraps, make 2-3 yards of bias tape (I made half inch tape, cutting 1.25" rather than 1" strips due to the loose weave).
Start by staystitching your curved seams for the armhole and neckline.
Stitch shoulder darts if you have any.
Stitch together front and back at shoulders.
Stich side seams.
Finish and trim all these seams.
Finish armholes using bias tape using staystitching as guide.
Form narrow hem at bottom edge of garment.
Pin bias tape to outside of garment with the lower edge of tape even with the waist line. Stitch lower edge then upper edge, leaving a neat opening at one side seam (to insert elastic).
Baste garment label or hang tag at back neck.
To elasticize the front neckline only, apply neckline tape as follows:
Pin bias tape to neckline. Stop after first line of stitching (i.e. tape has been stitched onto inside of garment). Trim seam allowance. Having one inch of very narrow (1/8") elastic pointed to the back of the garment stitch the elastic (across) at one shoulder only. Pin bias tape over elastic all along the front bodice, tucking the elastic behind the seam allowances and being sure not to pin the elastic. Top stitch the tape along the front neckline being sure not to catch the elastic. pull up elastic to desired gather. (You can measure your neckline on your pattern and mark out that much elastic, pulling it up to where the mark shows.) stitch down the elastic at the shoulder seam. Trim both ends of the elastic to 1/2". Finish pinning and stitching your bias tape at the back neckline as usual.
Using a safety pin, insert 1/4" elastic into casing at waistline (either trying on for length of elastic or cutting it to your waist measure plus one inch). Check that is is not twisted. Overlap ends by one inch and stitch securely.
Last step is hand finishing: using a slip stitch, join all ends of bias tape (at each armhole, at neck, and at waist).
You're done! Good job :)
rear view

Mistakes

Forgot about blousing at waist in drafting stage so garment came out shorter than expected and forgot to widen the hemline for added ease.
May have drafted the back bodice wrong as there is too much fabric at waist back.

Cut back bodice on selvedge rather than the fold (ugh). Had to put in the flat felled seam along the center back  (it looks OK as a design element). Back neck and back bodice are subsequently 5/8" too narrow which is negligible.

Sewed in a little pinch at back neck and caused some kind of hole there also.
Stitched the shoulder seams forward (rather than the usual back) when applying the armhole bias tape.
Stitched some of the bias tape with straight rather than angled seams.
Stitched shoulder darts a little wonky; bias tape stitched on a little wavy in parts.

Suggestion: when working with a gauze or fabric that frays like this, I recommend all your seams be flat felled or otherwise encased. If the fabric is thin, seams are not bulky, and the encased nature of the seam prevents all fraying. Think ahead. Small garments or areas cannot be stitched this way but on such a large garment like this (also the PJs I made my dad), it's easy to stitch a flat felled for all seams. Now that I've worked with gauze I will encase all the seams next time.


gathered neckline

What I like & Conclusions

The style: sleeveless, pull-on shape with modest neckline and long length.
Fun printed gauze in summery colors and pattern I don't usually wear.
Length of fabric was $4.50 and I still have four yards of it.
Construction: Despite a long list of errors when you're looking at it none of them are visible; it looks fairly professional. Mike said "it's cute" when I showed it to him on the hanger.

This was a fun project that I could see myself making again.


P.S. Also had to make a layering camisole.


Wednesday, April 11, 2012

French Toast

Sundays are a good day for a hot breakfast (or brunch!). This recipe is easy to execute. Keep in mind that egg quality will make a big difference in the final outcome (and color). This particular day the toast was served with a delicous warmed marion berry jam from local company Mountain Fruit Co. Fruit compotes, thick fruit syrups, or real maple syrup are all great toppers (along with a little pat of salty butter, of course).


French Toast with Jam
French Toast
Yield: 6 slices (serves two people)
Prep time: 5 minutes
Cook time: 5-8 minutes per slice


Ingredients


2 eggs, room temperature
1/2 C cream (or milk)
1 tsp vanilla extract
1/2 tsp cinnamon (optional)
2 TB white sugar
6 slices stale french breadsalted butter for frying
2-3 TB Topping of choice


Instructions


  1. In medium dish or bowl, beat eggs, cream, vanilla, cinnamon, and sugar until smooth.
  2. Soak bread in batter, at least 30 second each side.
  3. In frying pan over low-medium temperature, fry battered bread in butter a few minutes each side until golden brown.
  4. Keep warm in low oven while preparing the rest of breakfast.
  5. Serve warm with a small pat of butter and a heated topping such as jam, thick fruit syrup, or maple syrup. You can dust with icing sugar if topping is served on the side.


Tip: Fresh french bread that goes stale overnight is the perfect bread for this. Cut slices at an angle for attractive presentation. Slices of bread can be frozen, and toasted lightly before battering for added dryness.

Friday, March 30, 2012

ideas

I just bought this grey corduroy for a men's jacket.


And I've got my eyes on this coral fabric for a top. (Update: I bought this fabric.)

I think my next project will, however, be a blouse!

Monday, March 26, 2012

Vote for Me

Are you a member of yourstylerocks.com? Then you can (and should!) vote for my design "Mid 60s Mod Mini" in their current contest "Mad Women," closing April 30.
YourStyleRocks holds contests where the winning clothing design is rendered into a free downloadable pattern (standard sizing).
I think my dress would be fun to make, so vote for my design!

Monday, March 12, 2012

casual top sequel

Simplicity 1938 in rayon blend jersey

I just completed this casual top.
I may have mentioned I got a stripe jersey in a rayon blend when I was in Oakland. I love rayon jersey. Love it! Many of my (and your) favorite RTW drapey tops, skirts, and PJs are probably made of this wonder fabric. So you'll be glad to hear that this stuff isn't too difficult to sew with.
This is the second stretch garment I've attempted and I'm fairly happy with the results. Perhaps a B for execution but A for wearability.
I reused Simplicity 1938. I left the lower hem raw, shortened the sleeves to the elbow, adding elastic. This jersey behaved pretty differently as you can see comparing the first top to the second. I don't know what else to say about this top other than I'm sure I'll wear it all the time!
First version of Simplicity 1938 in horrendous polyester interlock

Wednesday, February 15, 2012

Self-drafted Pleated Skirt - Done!

Well it came out a little bit long - which I didn't notice until I saw the pictures. And it's a little loose at the waist (somehow). And I got a run in my tights right before taking these pics. But otherwise I'm pretty happy with the results.
You can see the bend of the knee and how much longer the skirt is!

Here is the zip and vintage glass button. And loose-fitting waist.

Here is my bad posture and a good shot of the shape of the skirt.

Ta da! My first skirt :)

Tuesday, February 7, 2012

Skirt nearing completion

Spent a lot of time hand sewing today. Slip stitching the inside of the waistband to be exact, then finishing the zipper, and the button loop. Had time to hem but am just over it! Here is a sneak peek.

Friday, February 3, 2012

Print-tastic Skirt

Yesterday I designed the skirt pattern in 1/4 scale and then drafted it onto contractor's paper. I used "Pattern Drafting for Dressmaking" (which I have an e-copy of) and actually chose the first project, "side inverted pleat with dart shaping."
Today I have cut out the three pattern pieces and am trying to construct it. I've never made anything pleated before. When I'm at a loss I cast about for references. There's a little bit in "Complete Guide to Sewing," this picture tutorial, this pdf "Darts, Ease, Gathers, Pleats, Shirring, Tucks" that addresses the problem. What I am unsure about executing the is dart releasing the pleat...
University of Kentucky College of Agriculture Cooperative Extension Service - your PDFs are rad. I haven't found any lists of PDFs and just bump into y'all with google but when I find one, it's golden.
Anyway I should get back to that construction just thought I'd stop by and check in.

Thursday, February 2, 2012

Print-tastic

For my birthday my spouse took me to see the ballet in San Francisco. We made it in to a weekend trip so Saturday we went shopping. I got this black and white print fabric in a heavy, smooth polyester at Silk Road in Oakland. I knew when I saw it that it ought to be a skirt - fabric store lady suggested a jacket which is a great idea but not something my wardrobe needs as badly. Here is an example of the skirt shape I'm thinking about. The question now is, do I have time to draft and construct it to be ready by my birthday (on Monday!)?

Thursday, January 26, 2012

Quick Casual Top


I wanted to try my hand at making a top. I went to Joanns and nine dollars and three days later I have... Simplicity 1938 view B. This top has a banded V neck, 3/4 length raglan sleeves, and a loose fit.
I wanted to practice with stretch so got a cheap black fabric (literally and figuratively). I think a better choice would have been something silkier or something rayon.
The pattern was fairly easy to execute. There seemed to be some missing information which is unusual. The neckband was a little fiddly so I do recommend hand basting each step of the neck band. However I think it went well - and this is the fastest garment I've ever put together!
I would recommend this top if you like loosely fitted garments with a modest shape... especially if you like prints which would look much better than this solid color. There's a lot of "silky" prints at Joanns, often on sale. You could pair this top with basic trousers, jeans, and slim skirts and it would be work/school appropriate for just about everyone.
I am thinking about remaking this top in a very lightweight cotton for summer. It would be a little more time consuming in a woven due to seam finishing but I think the pattern would need no modifications. Looking at the pictures, however, it may need to have shorter sleeves and something is going on with the back bunching and wrinkling.
Overall though, I'm happy :)


Simplicity 1938 B, front


Simplicity 1938 B, back

Saturday, January 21, 2012

Choc Chip Muffins

Today I'm cooking up a second batch of chocolate chip muffins as they were such an epic hit. I don't need to tell you that muffins are great because they're portable. Choc Chip is pretty decadent but with a nice white coffee it will really hit the spot one cold morning! One further great thing about these is they freeze up and microwave really well.
I've taken Felicia's basic muffin recipe and made it choc chippier. This time I've used a blend of milk chocolate and mini bittersweet choc chips but you can use whatever you want, including chunks and jumbo chips.


Standard: 12 muffins / 15 minutes
Jumbo: 6 muffins / 19 minutes
Baking Temperature: 400°F

Ingredients

2 C AP flour
1 TB baking powder
1/2 tsp salt
2 eggs
1 C milk or cream
2/3 C packed brown, or white sugar
8 TB melted butter
1 tsp vanilla
10 oz chocolate chips

Instructions

  1. In secondary bowl, whisk together flour, baking powder, and salt.
  2. In large bowl, whisk together eggs, milk, sugar, butter and vanilla.
  3. Add dry ingredients to wet but do not overmix.
  4. Fold in chips reserving an ounce or two for the tops
  5. Pour into greased muffin tins (or lined with paper cups)
  6. Sprinkle with a few extra chips.
  7. Bake at 400°, 15 mins for regular size or 19 minutes for jumbo, until stick comes out clean.
Tips
    • You can use white sugar and a dash of molasses together for brown sugar.
    • Muffin by Felicia Bock.

Monday, January 16, 2012

Night Nurse

I recently rented and enjoyed the 1931 Barbara Stanwyck film "Night Nurse." It's a "pre-code" film, so is dirty and silly with prohibition-era drinking, implied lesbianism, gangsters and child murderers. Good times!
Barbara Stanwyck

There's the lovely heroine standing up to the bad guy. What has inspired me is the great lingerie looks from this movie. Just as an excuse to show undressed ladies, our heroine and her nurse companion are always changing into and out of their clothes.

bralette

This silky, lace embellished bralette is totally fab, right? If I were smaller busted I'd be making myself one of these right now. This is just a taste of the lingerie looks I will feature (more to come).
One important thing to note is that the fastener/ stretch fabric situation back then was vastly different.  Modern underwear was just beginning development. For starters, no zippers! And sparing use of elastic and stretch fabric. The bloomers in the movie are fastened with a button. Bra fastenings appear to be modern but the nurse uniform in the movie is fastened with buttons at the back.
Meanwhile, here are some patterns that I could totally see in a bedroom scene on the silver screen.

Butterick 5152
Vogue 7837
Kwik Sew has a variety of lingerie patterns
pattern repro